
DJIA Cache – How To Set Up a CDN
This guide explains how to connect DJIA Cache with a Content Delivery Network (CDN).
A CDN helps deliver static files such as images, CSS, and JavaScript from servers located around the world, improving loading speed for visitors in different geographic regions.
This guide shows how to set up a CDN with DJIA Cache, from entering your CDN hostname to verifying that assets are really being served from the edge.
Quick Start
Use this guide if you want to serve your website’s static assets from a global CDN network.
Requirements:
- A configured Pull Zone from your CDN provider
- Access to the WordPress admin panel
Supported CDN providers include:
- Bunny.net
- KeyCDN
- StackPath
- other pull-based CDNs
1. The Problem
Serving all assets directly from your web server can slow down page loading for visitors located far from your server.
A Content Delivery Network (CDN) solves this by distributing copies of your static files across multiple global locations.
When a visitor loads your site:
- assets are served from the nearest CDN server
- latency is reduced
- page loading becomes faster
2. Steps to set up a CDN
Follow these steps to configure CDN support in DJIA Cache.
Step 1 — Get Your CDN URL
Log in to your CDN provider dashboard.
Locate the Pull Zone URL or CDN hostname.
Example:
https://yourzone.b-cdn.net
This URL will be used to rewrite asset requests through the CDN.
Step 2 — Configure DJIA Cache
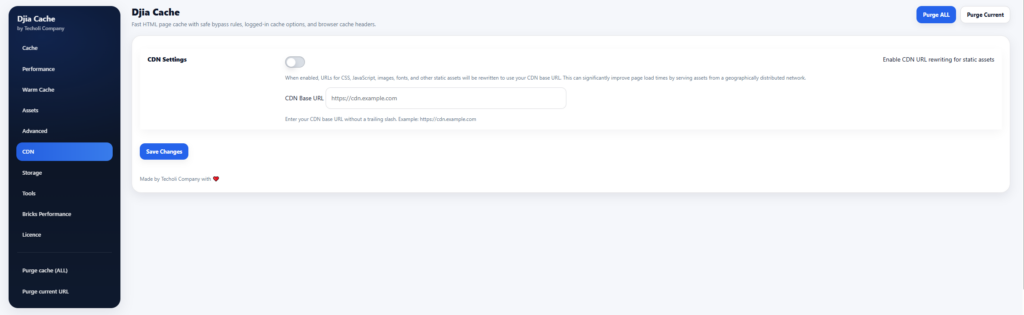
- Go to
Settings → DJIA Cache → CDN - Enable CDN integration.
- Paste your CDN base URL into the CDN URL field.
Example:
https://yourzone.b-cdn.net
- Choose which assets should be rewritten.
Recommended options:
- Images
- CSS files
- JavaScript files
- Click Save Changes.
Once enabled, DJIA Cache will automatically rewrite asset URLs to use your CDN.
Example transformation:
Original URL:
https://example.com/wp-content/uploads/image.jpg
CDN URL:
https://yourzone.b-cdn.net/wp-content/uploads/image.jpg
3. Verification
To verify that the CDN is working correctly:
- Open your website in an Incognito / Private browser window.
- Right-click an image and choose Open image in new tab.
- Check the URL in the browser address bar.
The asset should load from your CDN domain instead of your main domain.
Example:
https://yourzone.b-cdn.net/wp-content/uploads/image.jpg
4. Important Notes
⚠ Warning
If you are using Cloudflare, you typically do not need to enable CDN rewriting in DJIA Cache.
Cloudflare works at the DNS and proxy level and automatically handles asset delivery.
The CDN tab in DJIA Cache is intended for Pull CDNs that provide a dedicated CDN URL.
Related documentation
Further reading: Cloudflare caching documentation.